
Texture #3 – Surface Tension
This was going to be my third and last installment in my ‘texture’ series however, as I started to write, it occurred to me there was yet another category of quilted texture to explore before I move onto the final chapter. This third chapter I have decided to call – Surface Tension (and I am not referring to the thread tension of a sewing machine here).
Surface Tension is a scientific term that refers to the elasticity of a liquid that forces it to occupy the smallest surface it can, this is what confines water into a droplet or seek its own level. Water is inherently ‘sticky’ and anything that has mass but is too light in weight to break that sticky barrier will lie on that surface without falling through. This allows lightweight insects like Water Striders to skim across the surface of a pond literally ‘walking on water’. Likewise, something trying to rise from beneath the water’s surface has to contend with that constraint, it must be strong enough to defy gravity and break through that surface tension. Look at a close up of a Water Strider and you will see the slight weight of the creature does distort the level plane of the water where its legs touch; it’s just not heavy enough to break that surface tension as shown in the photo below.

So – what has all this to do with quilting? Think of the fabric layer that forms the quilt top as the surface layer of water, anything restrained below it like batting may press upwards in an attempt to break through that layer but is unable to do so. Rather, it causes a bulge in that surface and that is what creates the texture caused by the stitching that compresses the batting along the quilting lines, this is the batting trying to break through the surface tension of the quilt top. This is also why you don’t get nearly a nice a ‘sculpted’ texture when you appliqué with fusible web. No matter how soft the product claims to be, it still adds a layer of stiffness to the fabric that makes it resist the bulge you might otherwise get without the adhesive layer. Instead of sinking down into a depression produced by the stitching, the thread tends to lie along the surface of the fabric causing very little distortion but it is exactly that distortion that creates the lovely texture that captures light and shadow.
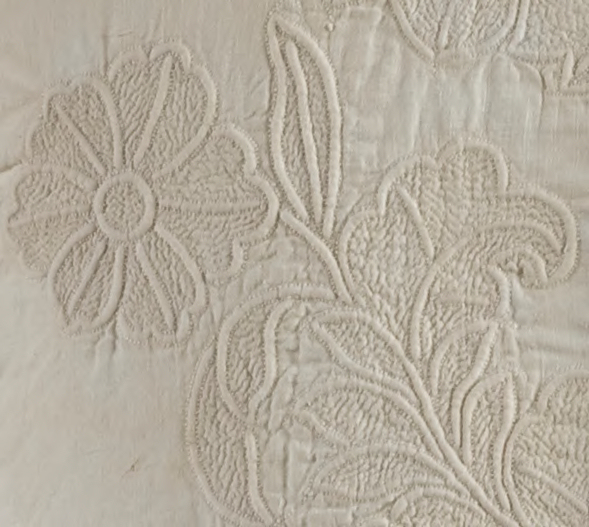
One form of quilting that takes this textural distortion to a higher level (pun intended) is Trapunto. This is a method in which specific areas on a quilt are stuffed or padded to make them more prominent than the rest of the quilting, this the most effective if used on a whole-cloth quilt or in areas of negative space with no piecing, appliqué or even a busy print to interfere with the beauty of the padded quilting.


There are several methods for doing Trapunto; in the historic versions, the quilted shapes were actually stuffed either by slitting the back of the quilt and inserting bits of wool ‘fluff’ through the slit then sewing that shut – which left the dilemma of how to preserve the integrity of the quilt; or in some cases the threads of the backing fabric were ‘teased’ apart then bits of wool tucked into the breach and then the threads painstakingly pushed back into place – yeah – like I’m really going to do THAT! With these methods, care must be taken, the shape needs enough stuffing to fill it well and prevent shifting/compacting of the filler resulting in a wool or cotton ‘ball’ bouncing around the space but also to avoid overstuffing which can cause unsightly bulging and distortion on large shapes. If the design involved channels of parallel quilting, yarn would be threaded into the layers with a needle and then the protruding ends clipped off very close to the insertion points, there was even a version of this where a cotton cord was stitched to the underside of a fabric with a backstitch that crisscrossed behind the work and created a raised line with a better definition due to the backstitch outlining the cording on the front. This method was particularly favored in England during the Elizabethan era. It was often applied to garments such as caps and vests where the cording and dense stitching gave the item both beauty and stability.
In contemporary times, other methods and innovations have arisen for working trapunto. John Flynn developed a Trapunto Stuffing Tube. You stuff pre-cut bits of batting into the end of the tube then slip the tube between the layered quilt and ‘inject’ the batting in place as you work your way up the quilt. Check out his You Tube video at https://www.youtube.com/watch?v=hpEro6cPfBY. His technique is better suited to quilting by hand, If you like to quilt by machine, the most commonly used method of Trapunto is to apply a preliminary layer of batting stitched to the backside of the quilt top using water soluble thread to follow the design to be padded and then trimming away the excess batting close to the stitching. The quilt is then layered with batting and backing in the normal method and then quilted along all the design lines including those previously stitched by the water soluble thread. After completion, the quilt is washed to remove the water soluble thread thus padding the areas with the double layer of batting rising above the level of the rest of the quilt. The benefit if this method is that the extra padding will remain flat with the batting less likely to ball up and shift than loose stuffing would. See this technique demonstrated at https://www.youtube.com/watch?v=fDjw4Wo37ew
There is a second ‘cheater’ Trapunto by machine method where the quilt is layered with a higher loft batting and after the Trapunto motifs are quilted, the surrounding areas are densely stitched to compact them. This exaggerates the puffiness of the open areas in contrast with the densely quilted areas; the work appears to be ‘double-stuffed’ but in actuality is just one layer of batting accentuated by the compacted areas. I have tried this method myself on a small artistic project and it was fairly easy to do.

Technology permeates all aspects of our lives these days; it makes you wonder what innovations lie on the quilting horizon. When we remodeled a home years ago we found a product that was ‘insulation in a can’ – you inject this liquid into the open space you want insulated and the liquid expands and fills the area with a foam that hardens. I see a similar product is being used by construction companies to raise and level concrete slabs. How about a liquid batting that you could inject into a quilt that would expand into a soft spongy fill? Anyone want to take that idea and run with it?
Look for the final chapter on texture coming soon; until then – May your stitches be short and neat, your life be long and sweet and your fabric stash be enough to keep you quilting.
