Hello my faithful readers. I have been having website problems. Something came up where I could not see my own photos – though it sounds like other visitors could and in the course of trying to fix this, several things happened:
First, I noticed that there was a new update from WordPress and I ran it thinking that might fix my gallery issue. What it did was suddenly display a flood of unread messages to my site, some dating back to June and forward. A few had been forwarded to my Gmail account as they are supposed to be but many had not. The update did not fix my gallery problem so I decided to contact Tech support at my server host and they found an issue that needed resolving that would take 24 hours and started the process; meanwhile I began replying to the messages starting with the oldest first. I made it up to late August when the whole site crashed. The next day they completed the process that needed to be done with the result that NOTHING on the site worked correctly anymore.
My son went to work on trying to repair is and several hours later, he managed to get it up and running but he had to restore it from the most recent backup – which wasn’t recent enough. I lost my most recent blog, my updated class calendar and all my newer messages that came after my last backup.
I managed to reply to some of the messages but not all so if you tried to reach me through the contact page on the site and never received a reply, please contact me again otherwise I have no record of your first attempt.
It’s going to take me at least a few days to re-enter the lost data – update my calendar of classes and rewrite the last blog. Luckily, I had drafted it in a Word document before transferring it to the blog so I haven’t lost the entire article, my priority however is in replacing the information about upcoming classes. Please bear with me while I restore my site.
Now for the final chapter on texture; this is Texture with a capital ‘T’. In this chapter we will explore embellishment to add texture to your quilt/ fiber projects.
In bygone eras, embellishment was mainly the empire of the Crazy Quilt. Most of the time it was embroidery but beads and other artifacts were sometimes added. Years ago, my guild hosted a speaker on Crazy Quilts who spoke of a Victorian era crazy Quilt that was embellished with a stuffed squirrel – yuck!
Now, we live in the era of embellishment and there are entire magazines devoted to this art form – Embellishment (a publication from Australia) is completely devoted to embellishment and other publications such as Cloth Paper Scissors, Quilting Arts, Threads and Stampington & Co. frequently feature articles about embellishment; the art of ‘adornment’ has broken free from the world of Crazy quilts.
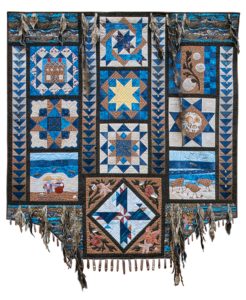
Though I had played a bit with embellishment early on – my second quilt incorporated an old mink coat pieced into the pattern – my first serious ‘conscious’ exploration into texture was a friendship quilt I made from blocks from my small quilt group. I had just finished a two and a half year project overseeing and making a somewhat traditional raffle quilt for my guild, and I was rebelling against flat and square. The theme was the beach retreat we took twice a year and after piecing the blocks together into an asymmetrical arrangement, I added a ‘fringe’ of seaweed made from Dupioni Silk along the top and bottom edges and a second ‘fringe’ along just the bottom made from drilled giant Sea Urchin spines, I also knotted some fishnet from Pearl Cotton and sewed seashells all over the quilt, The Sea Urchin spines add a particularly intriguing element as they clink musically if the quilt is moved.
A friendship quilt made from blocks made by my small quilt group. Note the ‘seaweed’ dangling along the top and bottom, the fishnet along the bottom and the fringe of sea urchin spines that tinkle like wind chimes along the bottom. The quilt is also embellished with seashells stitched here and there.
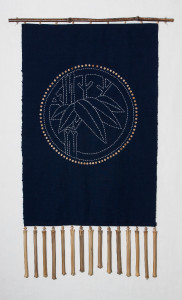
This gave me the idea to explore the idea of quilts that make sound and my next noisemaker art quilt was a Sashiko panel along the lines of Japanese Noren (ceremonial curtains that hang in a doorway) that has lengths of Bamboo segments in a fringe along the bottom edge. This panel, that I titled ‘Zen Wind Chimes’ also makes a lovely sound when the panel is stirred by a breeze if hung in an open window.
Sashiko Komon (clan crest) stitched on antique Japanese indigo cloth with a fringe of bamboo ‘culms’ that clink against each other if the panel wafts in a light breeze.
The genie is out of the bottle and there’s no putting him back; though I do still make more traditional ‘flat’ quilts, I am bolder about adding 3-dimensional embellishments to my art quilts. Buttons, beads, seashells… needle lace and fabric confetti – there is no better way to create lacy foliage to a landscape quilt than with confetti , and my Garden Window Nature Scrolls often sport berries made from beads, 3-D leaves and even some Maple samaras (the seed cases children often call ‘helicopters’) made from heavyweight painted and inked watercolor paper. I am also exploring the sea life found in a tide pool starting with my dimensional bead and embroidery Sea Anemones.
Thinking back, at first I thought I had not really done much tree dimensional work but when I started to contemplate what images I would like to include in the post, I realize I’ve used texture in my quilts far more often than I’d imagined
These quilts all employ some sort of dimensional texture
Stumpwork Sea Anemones - 3-D tentacles made from beads and dimensional hand embroidery
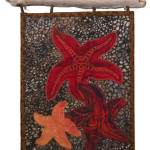
Hand appliqued Mola embellished with buttons and shells and shell fringe; tufted embroidery stitches and tassels
Wool Applique adorned with a variety of hand embroidery stitches.
Stumpwork Sea Anemones on hand-dyed canvas - beads and dimensional embroidery
Tide Pool quilt - Stumpwork 'Sea Anemones' made from beads and dimensional embroidery stitches
Windswept Tree- trees and shrubbery created with a confetti technique.
Winter Feast - a Nature Scroll featuring fussy cut birds feasting on winter berries made from wooden beads.
A 'symphony' of buttons and rings. Each line of buttons or rings symbolizes an instrument playing in a musical composition.
Maplewood - a Garden Windows Nature Scroll. Maple Samaras (seed casings) made from painted and inked 400 lb. Watercolor paper with a 3-D maple leaf embellishment at bottom right of the panel.
Art Journal Quilt - fabric strips machine embroidered over striped fabric embellished with beaded fringe.
Shell Dreams #1. A woven textures panel embellished with seashells and pebbles and textured quilting
Pagoda - Art 'tiles' embellished with buttons and beaded fringe; tiles attached to each other with bead spacers.
3-D fabric Pebbles
Yellowstone Lake - tree constructed from machine made needle lace.
Winter Falls - waterfall embellished with decorative eyelash yarn couched in place with ends allowed to hang freely.
Sunrise on the Marsh - marsh grasses created from fringes strips of fabric salvaged and trimmed from washed and dried yardage.
Sekhet-a-ra - Egyptian funerary mask padded applique, hair made from shredded cord. Side panel of overlapping pleated fabric.
Mourning Sun - Embellished with beads, artifacts, coins, and horsehair tassels. Tears made from brass chain.
And now for some shameless self promotion: if you are interested in learning a few of these 3-D techniques, I will be offering a couple of classes upcoming over the next few months and into next year at various venues shown below.
Button Fantasia – Hand embroidered medallions frame buttons on a pieced background with wool applique
a delightful way to showcase any solitary buttons you might have left over in your sewing box or, if you are a serious antique/decorative button collector, to display your treasures.
this is my strip-pieced/appliqué landscape technique with a new twist – creating three dimensional waves on a seascape using a variety of materials such as lace or confetti.
Cedar Ridge Quilts – Embroidered Folk Art Ornaments: these chubby stuffed little gems are made from hand embroidery on wool and are embellished with sequins and beads. Choose a cat, a peacock or a sweet little winged elephant.TIP: They need not be made into ornaments, they can also be used in wool applique projects.
Reversible Applique Quilt ‘Rock Stars’ the ‘other’ front side.Reversible Applique Quilt ‘Rock Stars’ – front side.
yes, you read that correctly – reversible, not reverse appliqué. This easy technique makes a two sided quilt that can be displayed from either side which in a way makes it 3-D in my opinion.
March 12, 2019: 3-D Fabric Pebbles:3-D fabric Pebbles
These are remarkably easy to make and with the right fabrics can look astoundingly real.
March 15, 2019: Stumpwork Sea Anemones:Tide Pool quilt – Stumpwork ‘Sea Anemones’
Often called the flowers of the sea, these creatures come in many brilliant color combinations and the texture of these embroidered and beaded projects has to be felt to be believed; they are so wonderfully tactile you can’t resist running your hand over them.
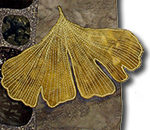
March 16, 2019: 3-D Fabric Leaves:3-D Ginko Leaf
Wonderfully ruffled and curled, these dimensional leaves can be used to embellish quilts, purses and bags, clothing and some artists even make jewelry from them.
I am also teaching the Stumpwork Anemones class in Florence later this August but that is a private class to a small quilt group and not open to the public,
And finally, my Art Journal Quilt classes held at three different locations –Pioneer Quilts(the first Friday of each month),Montavilla Sewing Center (the first Wednesday of each month at the Gresham location) and Sewn Loverly (the second Friday of each month). These classes vary from month to month and are not always on some sort of 3-D embellishment but those techniques are sometimes the focus of the classes.
This was going to be my third and last installment in my ‘texture’ series however, as I started to write, it occurred to me there was yet another category of quilted texture to explore before I move onto the final chapter. This third chapter I have decided to call – Surface Tension (and I am not referring to the thread tension of a sewing machine here).
Surface Tension is a scientific term that refers to the elasticity of a liquid that forces it to occupy the smallest surface it can, this is what confines water into a droplet or seek its own level. Water is inherently ‘sticky’ and anything that has mass but is too light in weight to break that sticky barrier will lie on that surface without falling through. This allows lightweight insects like Water Striders to skim across the surface of a pond literally ‘walking on water’. Likewise, something trying to rise from beneath the water’s surface has to contend with that constraint, it must be strong enough to defy gravity and break through that surface tension. Look at a close up of a Water Strider and you will see the slight weight of the creature does distort the level plane of the water where its legs touch; it’s just not heavy enough to break that surface tension as shown in the photo below.
Attribution – By Praveenp [CC BY-SA 3.0 (https://creativecommons.org/licenses/by-sa/3.0)], from Wikimedia Commons
So – what has all this to do with quilting? Think of the fabric layer that forms the quilt top as the surface layer of water, anything restrained below it like batting may press upwards in an attempt to break through that layer but is unable to do so. Rather, it causes a bulge in that surface and that is what creates the texture caused by the stitching that compresses the batting along the quilting lines, this is the batting trying to break through the surface tension of the quilt top. This is also why you don’t get nearly a nice a ‘sculpted’ texture when you appliqué with fusible web. No matter how soft the product claims to be, it still adds a layer of stiffness to the fabric that makes it resist the bulge you might otherwise get without the adhesive layer. Instead of sinking down into a depression produced by the stitching, the thread tends to lie along the surface of the fabric causing very little distortion but it is exactly that distortion that creates the lovely texture that captures light and shadow.
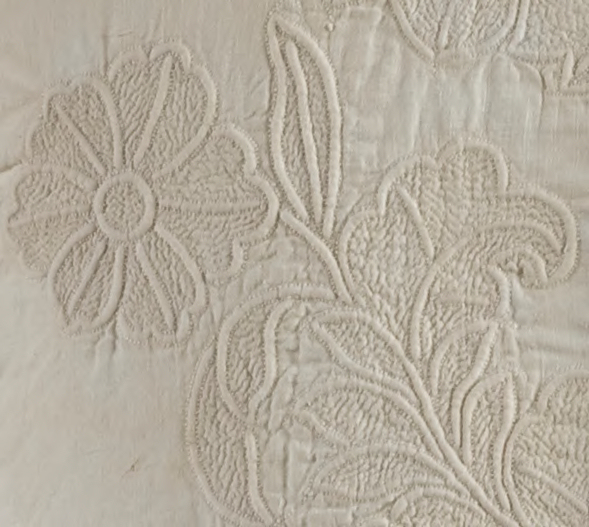
One form of quilting that takes this textural distortion to a higher level (pun intended) is Trapunto. This is a method in which specific areas on a quilt are stuffed or padded to make them more prominent than the rest of the quilting, this the most effective if used on a whole-cloth quilt or in areas of negative space with no piecing, appliqué or even a busy print to interfere with the beauty of the padded quilting.
Trapunto – Early 18th Century Italian. Attribution – Cooper Hewitt, Smithsonian Design Museum [Public domain], via Wikimedia Commons
Detail – United States, 1846 Cotton and glazed chintz, pieced, quilted, stuffed and appliquéd in ‘broderie perse’ Attribution – Los Angeles County Museum of Art [Public domain], via Wikimedia Commons
There are several methods for doing Trapunto; in the historic versions, the quilted shapes were actually stuffed either by slitting the back of the quilt and inserting bits of wool ‘fluff’ through the slit then sewing that shut – which left the dilemma of how to preserve the integrity of the quilt; or in some cases the threads of the backing fabric were ‘teased’ apart then bits of wool tucked into the breach and then the threads painstakingly pushed back into place – yeah – like I’m really going to do THAT! With these methods, care must be taken, the shape needs enough stuffing to fill it well and prevent shifting/compacting of the filler resulting in a wool or cotton ‘ball’ bouncing around the space but also to avoid overstuffing which can cause unsightly bulging and distortion on large shapes. If the design involved channels of parallel quilting, yarn would be threaded into the layers with a needle and then the protruding ends clipped off very close to the insertion points, there was even a version of this where a cotton cord was stitched to the underside of a fabric with a backstitch that crisscrossed behind the work and created a raised line with a better definition due to the backstitch outlining the cording on the front. This method was particularly favored in England during the Elizabethan era. It was often applied to garments such as caps and vests where the cording and dense stitching gave the item both beauty and stability.
Los Angeles County Corded Quilting, detail of a man’s waistcoat c. 1760. Attribution – Museum of Art [Public domain], via Wikimedia Commons
In contemporary times, other methods and innovations have arisen for working trapunto. John Flynn developed a Trapunto Stuffing Tube. You stuff pre-cut bits of batting into the end of the tube then slip the tube between the layered quilt and ‘inject’ the batting in place as you work your way up the quilt. Check out his You Tube video at https://www.youtube.com/watch?v=hpEro6cPfBY. His technique is better suited to quilting by hand, If you like to quilt by machine, the most commonly used method of Trapunto is to apply a preliminary layer of batting stitched to the backside of the quilt top using water soluble thread to follow the design to be padded and then trimming away the excess batting close to the stitching. The quilt is then layered with batting and backing in the normal method and then quilted along all the design lines including those previously stitched by the water soluble thread. After completion, the quilt is washed to remove the water soluble thread thus padding the areas with the double layer of batting rising above the level of the rest of the quilt. The benefit if this method is that the extra padding will remain flat with the batting less likely to ball up and shift than loose stuffing would. See this technique demonstrated at https://www.youtube.com/watch?v=fDjw4Wo37ew
There is a second ‘cheater’ Trapunto by machine method where the quilt is layered with a higher loft batting and after the Trapunto motifs are quilted, the surrounding areas are densely stitched to compact them. This exaggerates the puffiness of the open areas in contrast with the densely quilted areas; the work appears to be ‘double-stuffed’ but in actuality is just one layer of batting accentuated by the compacted areas. I have tried this method myself on a small artistic project and it was fairly easy to do.
My own ‘Cheater’ Trapunto
Technology permeates all aspects of our lives these days; it makes you wonder what innovations lie on the quilting horizon. When we remodeled a home years ago we found a product that was ‘insulation in a can’ – you inject this liquid into the open space you want insulated and the liquid expands and fills the area with a foam that hardens. I see a similar product is being used by construction companies to raise and level concrete slabs. How about a liquid batting that you could inject into a quilt that would expand into a soft spongy fill? Anyone want to take that idea and run with it?
Look for the final chapter on texture coming soon; until then – May your stitches be short and neat, your life be long and sweet and your fabric stash be enough to keep you quilting.